Kunai, a library for analyzing Dalvik Executable Files
Kunai is a project started around 2021 as a side project during one of the author’s PhD, and it has been refactored a couple of times with improvements on its C++ code. As we learned more about C++, we improved the base code from the project. In this post we will see a couple of already written projects in order to see how to use the library, so this will be just the beginning of a series of post about Kunai.
Authors
- Angela Sun
- Eduardo Blazquez
Kunai’s structure
Right now Kunai’s code looks similar to the structure you find in a project like LLVM. This is how the root of the project looks:

In the root folder we can find projects that are compiled using Kunai’s library, that will cover the topic of this post (we’ll see more interesting things in the future):
- header-parser: A very simple header printer to show the capabilities of Kunai library as a Dalvik header parser.
- dalvik-disassembler: A command line disassembler for dalvik that allows different output formats.
These are simple projects to show the capabilities of Kunai, and also as code documentation for anyone who wants to start using the library to have some code for easy copy-pasting.
The main part of the project is stored under the folder kunai-lib/, here we can find the whole project of the library:
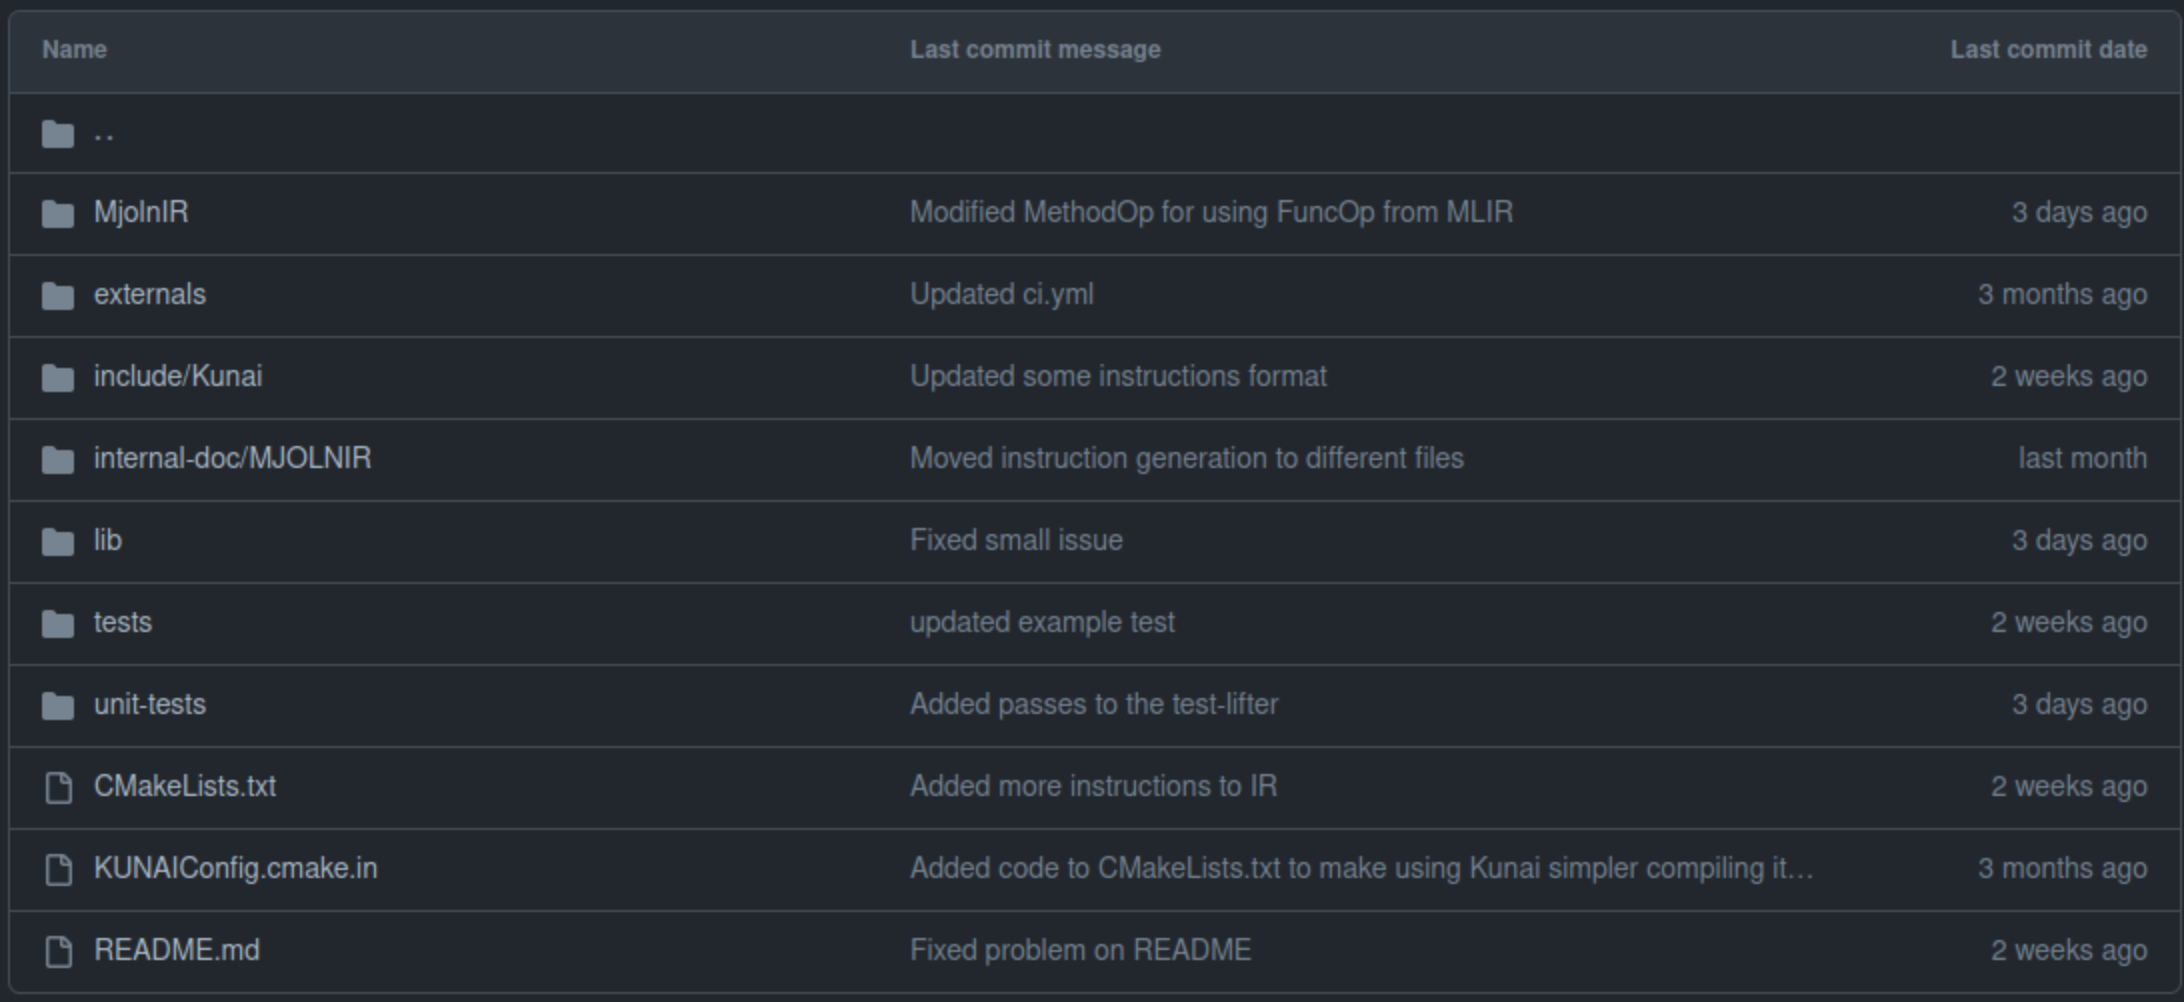
Here we find the next folders:
include/Kunai/:.hppand.deffiles from the library, here you can find all the header files from the project, internally it has the same structure as the.cppfiles. Many of the definitions were moved from.hppfiles, to.deffiles, making easier to maintain and modify in case it’s needed.lib: folder with all the code in.cppfiles, the structure is the same than in the headers folder.test: Java code with different tests for the library.unit-tests: different unit tests used for testing different parts of the library.
Kunai also offers an intermediate representation (IR) for allowing easy analysis of the code, an analyst can analyze smali code using the disassemblers from the library, or can use the IR offered by Kunai.
In previous version, the offered IR was written from scratch, but now the IR is written using MLIR, a framework from LLVM project that allows easyly writing of IRs, all the code for this IR can be found in the folder MjolnIR/ inside kunai-lib/.
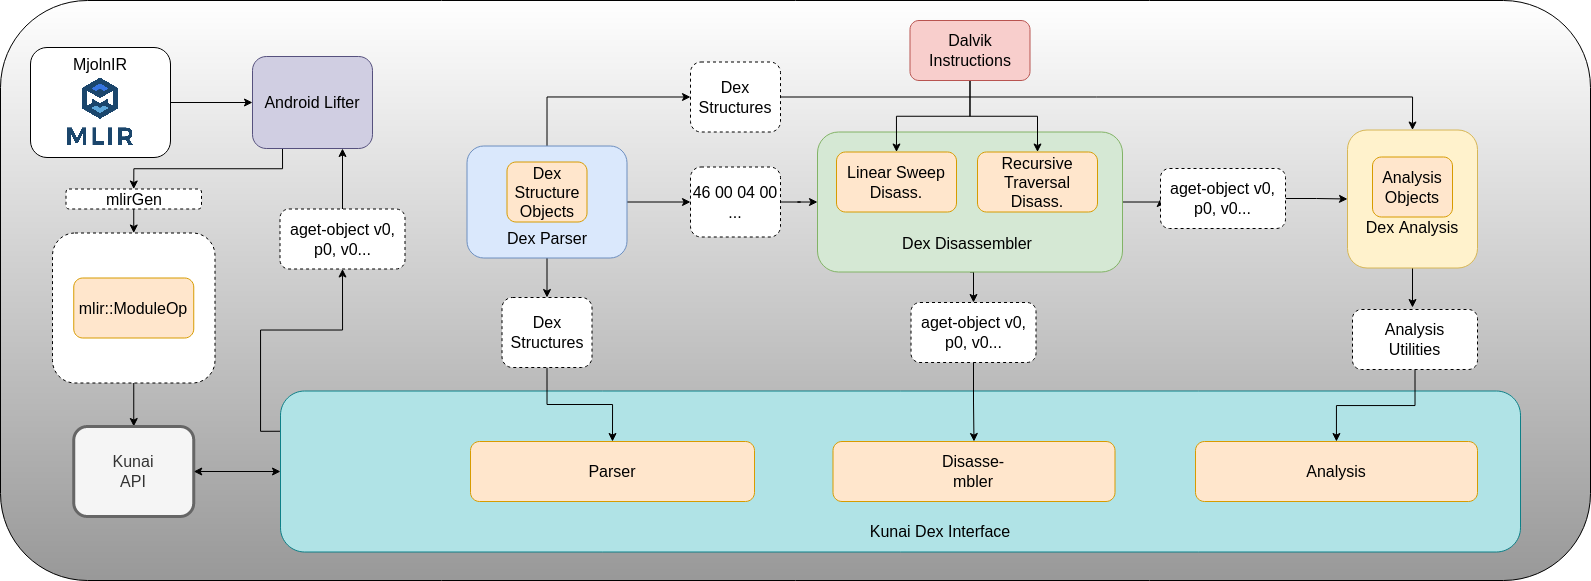
Next is a graphical representation from Kunai library, and more information about the IR can be found in the presentation from EuroLLVM 2023.
Kunai Library
As said at the beginning of the post, Kunai is intended to the analysis of Dalvik Executable Files, previous version also supported loading apk files, but currently that part is not supported yet.
Kunai is written in C++ and one of the benefits of this is the performance an analyst can obtain using it as library for other projects, also as you can see in the structure picture is intended to be as modular as possible, the main module of Kunai is divided into three important parts:
-
Dalvik parser (
Parserclass): this is a Dalvik parser written from scratch that allows analyst to access the different parts from Dalvik’s header,Parseris divided itself into different classes:Header,Strings,Types,Protos,Fields,MethodsandClasses. These classes offer all the information from the header to the analyst, and they are also subdivided in other classes, you can find more information about Dalvik header on Android’s documentation here, also you can see Corkami’s summary of Dalvik Executable format here. For each DEX analysis, the only action applied to the file is the parsing of its header, no disassembly or further analysis is done in order to keep the performance, in case an analyst just want to read values from the header, other actions over the file can affect the performance of the analysis, and in big DEX files, it can take a significant time to do analysis or cross-reference (xref) analysis. -
Dalvik disassembler (
DexDisassemblerclass): Kunai implements a disassembler for Dalvik Bytecode, internally two algorithms are implemented for doing the analysis. One is the linear sweep disassembler which analyze the bytecode from the first to the last byte of a method decoding the dalvik instructions. The other is recursive traversal disassembler which takes all the possible entries from a method, and then starts decoding following the control flow from the method. Any of both algorithm can be selected before applying the disassembly. The disassembler will apply the disassembly process to all the methods from DEX file. Each instruction has a base classInstruction, and each instruction type is a class that derives from that base. More information from the Instruction formats can be found on Android’s documentation here. -
Dalvik analysis (
Analysisclass): for a more complete binary analysis, parsing and disassembly is not enough. These classes from the Analysis module offers the analysts the code divided inMethodAnalysisobjects, which contains aBasicBlocksobject withDVMBasicBlocks for representing the Control-Flow Graph (CFG). Together with the CFG, theAnalysisclass offers xrefs for the Dalvik classes, Dalvik methods, Dalvik fields and Dalvik strings, with all this information an analyst can construct a Call Graph (CG). Also it is possible to look for classes or methods using regular expressions, instead of the standardized name (e.g.LJava/Class/Name;). -
MjolnIR: while the MLIR based IR is still an ongoing project, it can be used for testing purposes. For using the IR a
Lifteris provided that takes aMethodAnalysisobject, and using the CFG it generates aFuncOpfrom MLIRfuncdialect divided byBasicBlocks.
Installation
In this section of the post we will see the different ways for compiling and installing Kunai library. In one of the refactoring of Kunai, the compilation chain was moved from a Makefile to CMake allowing the project be easily extended.
Compilation without MjolnIR
First of all, we have to move to kunai-lib/ folder, and we will run the next command:
$ cmake -B build -S .
We can choose with CMAKE_BUILD_TYPE if we want to compile in Release mode or Debug mode:
# for Release compilation
$ cmake -S . -B build -D CMAKE_BUILD_TYPE=Release
# for Debuc compilation
$ cmake -S . -B build -D CMAKE_BUILD_TYPE=Debug
If we want to compile the unit testing files we can set the flag UNIT_TESTING:
$ cmake -S . -B build -D CMAKE_BUILD_TYPE=DEBUG -D UNIT_TESTING=ON
If you want to speedup the compilation process, you can use the flag -j or -j <number of processes>, this will make compilation faster. Finally if you want to install libkunai.so in your system, you can run the next command:
$ sudo cmake --install build/
Compilation with MjolnIR
MjolnIR depends on MLIR project, so first of all you’ll need to compile MLIR with the LLVM project, this process will take some time and it’s described in the README.md file from kunai-lib/ folder. If we want to compile Kunai with MjolnIR, we recommend using clang++ as compiler and lld as linker. Then we will run the next commands:
# configure the project
$ cmake -S . -B build/ -DCMAKE_C_COMPILER=clang -DCMAKE_CXX_COMPILER=clang++ -DCMAKE_BUILD_TYPE=Debug -DUSE_MJOLNIR=ON -DCMAKE_EXE_LINKER_FLAGS="-fuse-ld=lld" -DUNIT_TESTING=ON
-- The CXX compiler identification is Clang 17.0.0
-- Detecting CXX compiler ABI info
-- Detecting CXX compiler ABI info - done
-- Check for working CXX compiler: /usr/local/bin/clang++ - skipped
-- Detecting CXX compile features
-- Detecting CXX compile features - done
-- C++ compiler ID: Clang
-- C++ compiler version: 17.0.0
-- Build Type: Debug
...
# compile it
$ cmake --build build/ -j
In the previous command, compilation was done with Debug build type, this can be changed to Release in case you don’t want to debug anything from the library.
Usage
Now we will see how we can make use of Kunai, we will do that introducing the examples mentioned at the beginning of the post. First we will learn how we can print the DEX header in a very simple way, and then we will see how we can have a very simple TUI disassembler in less than 219 lines of code.
Simple DEX Parsing
As we commented before, the only action Kunai library does when a DEX file is loaded is parsing its header. This avoids the need to wait until all the methods have been disassembled and then analyzed to create the xrefs. For this part of the post, we will use the code under the folder headers-parser created by Angela.
The first thing we will need in order to analyze a DEX file is provide the path to the file to one of the static functions from the Dex class, the name of the function is parse_dex_file and returns a std::unique_ptr instance of the Dex class, this object contains all the necessary classes for analyzing the DEX file.
// parse dex file
auto dex_file = KUNAI::DEX::Dex::parse_dex_file(argv[1]);

if (!dex_file->get_parsing_correct())
{
    std::cerr << "Error analyzing " << argv[1] << ", maybe DEX file is not correct...\n";
    return -1;
}
In the previous code, we have a call to the mentioned function, giving as parameter the first argument of the parser, here is where it goes the path to the DEX file. In case any error happened during the parsing process, this can be checked with the get_parsing_correct function which will return true in case no error happened.
In case no error happened, it means parsing process was successful (easy enough, don’t you think?). Now what we will do is to obtain a pointer to the DEX Parser object, this object contains all the headers from the DEX file, but due to the complexity of the DEX file format, not all the headers will be covered in this post. To retrieve the Parser object, just call the function get_parser from the Dex object:
auto dex_parser = dex_file->get_parser();
This parser will provide us with all the objects that represent each part from the DEX header, the functions from the parser will provide us with references or const references, in this example we will just retrieve the references. Most of these classes also override the operator<< allowing us to print them to cout easily. This way, we keep for the example the classes just as black boxes, and rely on their implementation for printing them.
// HEADER
auto& dex_header = dex_parser->get_header();
std::cout << dex_header << "\n";

// STRINGS
auto& dex_strings = dex_parser->get_strings();
std::cout << dex_strings << "\n";

// TYPES
auto& dex_types = dex_parser->get_types();
std::cout << dex_types << "\n";

// FIELDS
auto& dex_fields = dex_parser->get_fields();
std::cout << dex_fields << "\n";

// CLASSES
auto& dex_classes = dex_parser->get_classes();
std::cout << dex_classes << "\n";

// PROTOS
auto& dex_protos = dex_parser->get_protos();
std::cout << dex_protos << "\n";

// METHODS
auto& dex_methods = dex_parser->get_methods();
std::cout << dex_methods << "\n";

// MAP LIST
auto& dex_map_list = dex_parser->get_maplist();
std::cout << dex_map_list << "\n";
As you can see, for each header, we have different getters to retrieve a reference, you can use auto from C++ in order to avoid writing the name of the class all the time. In previous implementations, Kunai returned pointers instead of references, in this one, we avoid returning a null value, and you can safely use the object as in this case.
Let’s test this parser in a DEX file, and see what we get as result:
$ cd headers-parser/
$ cmake -B build -S . -DCMAKE_C_COMPILER=clang -DCMAKE_CXX_COMPILER=clang++ -DCMAKE_EXE_LINKER_FLAGS="-fuse-ld=lld-16" -DCMAKE_BUILD_TYPE=Release
$ cmake --build build/
[ 50%] Building CXX object CMakeFiles/headers-parser.dir/headers-parser.cpp.o
[100%] Linking CXX executable headers-parser
[100%] Built target headers-parser
$ ./headers-parser ../../kunai-lib/tests/test-assignment-arith-logic/Main.dex
DEX Header
Magic: 100(d) 101(e) 120(x) 10(\n) 48(0) 51(3) 53(5) 0
Checksum:                     148832538
Signature:                    54 101 248 21 82 71 185 249 68 129 234 126 24 8 250 68 254 9 96 173
File Size:                    1876
Header Size:                  112
Endian Tag:                   305419896
Link Size:                    0
Link Offset:                  0
Map Offset:                   1680
String Ids Size:              41
String Ids Offset:            112
Type Ids Size:                16
Type Ids Offset:              276
Proto Ids Size:               9
Proto Ids Offset:             340
Field Ids Size:               5
Field Ids Offset:             448
Method Ids Size:              12
Method Ids Offset:            488
Class Defs Size:              1
Class Defs Offset:            584
Data Size:                    1260
Data Offset:                  616

Dex Strings
String (0): 1534->"value"
String (1): 1525->"println"
String (2): 1520->"out"
String (3): 1505->"ojete de vaca"
String (4): 1469->"field_int_array"
String (5): 1458->"field_int"
String (6): 1443->"field_boolean"
String (7): 1436->"close"
String (8): 1290->"Ljava/lang/System;"
String (9): 1270->"Ljava/lang/String;"
String (10): 1153->"Ldalvik/annotation/Throws;"
String (11): 1356->"VF"
String (12): 1181->"Ljava/io/InputStream;"
String (13): 1496->"nextInt"
String (14): 1142->"J"
String (15): 1145->"LMain;"
String (16): 1204->"Ljava/io/PrintStream;"
String (17): 1139->"I"
String (18): 1342->"Test case"
String (19): 1490->"main"
String (20): 1372->"VZ"
String (21): 1136->"F"
String (22): 1486->"in"
String (23): 1250->"Ljava/lang/Object;"
String (24): 1368->"VL"
String (25): 1331->"Main.java"
String (26): 1360->"VI"
String (27): 1118->"<clinit>"
String (28): 1379->"[I"
String (29): 1541->"~~D8{"compilation-mode":"debug","min-api":1,"version":"1.5.13-q1"}"
String (30): 1128->"<init>"
String (31): 1364->"VJ"
String (32): 1376->"Z"
String (33): 1383->"[Ljava/lang/String;"
String (34): 1353->"V"
String (35): 1412->"c <= 20"
String (36): 1227->"Ljava/lang/Exception;"
String (37): 1404->"c <= 0"
String (38): 1421->"c > 0"
String (39): 1310->"Ljava/util/Scanner;"
String (40): 1428->"c > 20"

DEX Types:
Type (0) -> "float"
Type (1) -> "int"
Type (2) -> "long"
Type (3) -> "Main"
Type (4) -> "dalvik.annotation.Throws"
Type (5) -> "java.io.InputStream"
Type (6) -> "java.io.PrintStream"
Type (7) -> "java.lang.Exception"
Type (8) -> "java.lang.Object"
Type (9) -> "java.lang.String"
Type (10) -> "java.lang.System"
Type (11) -> "java.util.Scanner"
Type (12) -> "void"
Type (13) -> "boolean"
Type (14) -> "int[]"
Type (15) -> "java.lang.String[]"

DEX Fields:
Field(0): LMain;->field_boolean Z
Field(1): LMain;->field_int I
Field(2): LMain;->field_int_array [I
Field(3): Ljava/lang/System;->in Ljava/io/InputStream;
Field(4): Ljava/lang/System;->out Ljava/io/PrintStream;

DEX Classes:
Class(0): Main, Superclass: java.lang.Object, Source file: Main.java, Access flags: public

DEX Protos:
Proto (0): I
Proto (1): V
Proto (2): VF
Proto (3): VI
Proto (4): VJ
Proto (5): VL
Proto (6): VL
Proto (7): VZ
Proto (8): VL

DEX Methods:
Method(0): void Main-><clinit>(), Access Flags: final constructor
Method(1): void Main-><init>(), Access Flags: public constructor
Method(2): void Main->main(java.lang.String[]), Access Flags: public final
Method(3): void java.io.PrintStream->println(float), Access Flags: <External Method>
Method(4): void java.io.PrintStream->println(int), Access Flags: <External Method>
Method(5): void java.io.PrintStream->println(long), Access Flags: <External Method>
Method(6): void java.io.PrintStream->println(java.lang.String), Access Flags: <External Method>
Method(7): void java.io.PrintStream->println(boolean), Access Flags: <External Method>
Method(8): void java.lang.Object-><init>(), Access Flags: <External Method>
Method(9): void java.util.Scanner-><init>(java.io.InputStream), Access Flags: <External Method>
Method(10): void java.util.Scanner->close(), Access Flags: <External Method>
Method(11): int java.util.Scanner->nextInt(), Access Flags: <External Method>

DEX Map List:
Map item (0): TYPE_MAP_LIST, Size: 1, Offset: 1680
Map item (1): TYPE_ANNOTATIONS_DIRECTORY_ITEM, Size: 1, Offset: 1656
Map item (2): TYPE_ANNOTATION_SET_ITEM, Size: 2, Offset: 1644
Map item (3): TYPE_HEADER_ITEM, Size: 1, Offset: 0
Map item (4): TYPE_STRING_ID_ITEM, Size: 41, Offset: 112
Map item (5): TYPE_TYPE_ID_ITEM, Size: 16, Offset: 276
Map item (6): TYPE_TYPE_LIST, Size: 7, Offset: 1064
Map item (7): TYPE_CLASS_DATA_ITEM, Size: 1, Offset: 1617
Map item (8): TYPE_PROTO_ID_ITEM, Size: 9, Offset: 340
Map item (9): TYPE_CODE_ITEM, Size: 3, Offset: 616
Map item (10): TYPE_FIELD_ID_ITEM, Size: 5, Offset: 448
Map item (11): TYPE_STRING_DATA_ITEM, Size: 41, Offset: 1118
Map item (12): TYPE_METHOD_ID_ITEM, Size: 12, Offset: 488
Map item (13): TYPE_DEBUG_INFO_ITEM, Size: 3, Offset: 1020
Map item (14): TYPE_CLASS_DEF_ITEM, Size: 1, Offset: 584
Map item (15): TYPE_ANNOTATION_ITEM, Size: 1, Offset: 160
As you can see, in this case we obtain a very verbose output, since by default, printing the object will use the default printer that just dumps all the information about the object itself. In the next section we will see how to make a more specific printing of the headers, checking some internal structures.
You can find the whole code for this example here
Specific DEX Parsing
In the previous example we presented the parser, and we showed a way for printing information passing the object to the std::cout, invoking the default printer from the object. This time we will change it in order to show how we can dig into the structures the parser offers. In this example, we will just print some data from the header, and then some information about the classes.
The beginning of the code is exactly as before:
// parse dex file
auto dex_file = KUNAI::DEX::Dex::parse_dex_file(argv[1]);

if (!dex_file->get_parsing_correct())
{
    std::cerr << "Error analyzing " << argv[1] << ", maybe DEX file is not correct...\n";
    return -1;
}
This will be basic in all the analysis we write with Kunai, since it’s the initializer for the DEX structures. Again we will retrieve the Parser object, but also the Header object as a constant reference:
// get pointer to parser
auto dex_parser = dex_file->get_parser();

const auto& dex_header = dex_parser->get_header_const();
From the Header object we can access the dexheader_t which is a structure with all the fields from the header, we will print the checksum, and the printable characters from the magic bytes:
std::cout << "DEX Checksum: " << dex_header.get_dex_header_const().checksum << '\n';

std::cout << "DEX Magic: ";
for (auto val : dex_header.get_dex_header_const().magic)
    if (std::isprint(val))
        std::cout << val;
std::cout << '\n';
Now we will retrieve the Classes object, but this time instead of printing it directly, we will go over different internal components, for example the ClassDef objects which contain all the information about the class, the DVMClass which holds the number of the class and its type of data, the access flags, and other information about the class:
auto & classes = dex_parser->get_classes();

for (auto & classdef : classes.get_classdefs())
{
    auto class_data = classdef->get_class_idx();

    if (!class_data) continue;

    std::cout << "Object Type: " << class_data->print_type()
        << ", Name: " << class_data->get_name() << '\n';

    const auto & source_file = classdef->get_source_file();

    if (!source_file.empty())
        std::cout << "Source file: " << source_file << '\n';

    std::cout << "Access Flags: " << KUNAI::DEX::DalvikOpcodes::get_access_flags_str(classdef->get_access_flags())
        << '\n';

    auto & class_data_item = classdef->get_class_data_item();

    std::cout << "Number of static fields: " << class_data_item.get_number_of_static_fields()
                << "\nNumber of instance fields: " << class_data_item.get_number_of_instance_fields()
                << "\nNumber of direct methods: " << class_data_item.get_number_of_direct_methods()
                << "\nNumber of virtual methods: " << class_data_item.get_number_of_virtual_methods() << '\n';

    auto superclass = classdef->get_superclass();

    if (superclass)
        std::cout << "Object Type: " << superclass->print_type() << ", Name: " << superclass->get_name() << "\n";
}
In some cases where the object is present, we will have a reference to the object, in other cases, the value is not always present in a DEX file, and we will retrieve a pointer, in those cases it is better to check the pointer is correct. Now let’s compile and run it to see what we get:
$ cmake -B build -S . -DCMAKE_C_COMPILER=clang -DCMAKE_CXX_COMPILER=clang++ -DCMAKE_EXE_LINKER_FLAGS="-fuse-ld=lld-16" -DCMAKE_BUILD_TYPE=Release
$ cmake --build build/
$ cd build
$ ./header-simple-printer ../../kunai-lib/tests/test-assignment-arith-logic/Main.dex
DEX Checksum: 148832538
DEX Magic: dex035
Object Type: Class, Name: LMain;
Source file: Main.java
Access Flags: public
Number of static fields: 3
Number of instance fields: 0
Number of direct methods: 3
Number of virtual methods: 0
Object Type: Class, Name: Ljava/lang/Object;
You can find the whole code for this example here.
A Simple Disassembler
We will move now to the last part of this post where we will show how a very simple disassembler is written in 220 lines of C++ code, with the necessary code to print it in a cool way!
This disassembler is intended to allow user printing different output formats, also it allows using the different disassembly algorithms from Kunai. So first of all our code must manage all these command line stuff, we will use a very simple command line parsing:
int main(int argc, char **argv)
{
    /// use the recursive disassembler?
    bool use_recursive = false;
    bool show_blocks = false;
    bool show_plot = false;

    if (argc == 1 || (argc > 1 && !strcmp("-h", argv[1])))
    {
        show_help(argv);
        return 1;
    }

    // check that 4 arguments were given
    if (argc < 4)
    {
        show_help(argv);
        return 1;
    }

    // check if one argument more was given
    // check if it is correct
    if (argc > 4)
    {
        const std::vector<std::string_view> optional_args(argv + 4, argv + argc);

        for (const auto val : optional_args)
        {
            if (val == "-r")
                use_recursive = true;
            if (val == "-b")
                show_blocks = true;
            if (val == "-p")
                show_plot = true;
        }
    }
With this code we will store in different bool variables the different options, for example if user specifies -r we will set use_recursive to true and later we will configure Kunai to use this algorithm, the other options will be used to show the blocks from the method, instead of a linear disassembly, or if the user wants to plot the graph to a dot file. In case we find any kind of error, we print a help message using the function show_help:
void show_help(char **argv)
{
    std::cerr << "[-] USAGE: " << argv[0] << " <dex_file> <class_name> <method_name> [-r]\n";
    std::cerr << "\t<dex_file>: dex file to disassembly\n";
    std::cerr << "\t<class_name>: name of the class to extract\n";
    std::cerr << "\t<method_name>: name of the method to extract\n";
    std::cerr << "\t[-r]: optional argument, use recursive disassembly algorithm\n";
    std::cerr << "\t[-b]: show the instructions as basic blocks\n";
    std::cerr << "\t[-p]: show a plot with the blocks in .dot format\n";
}
After this, we will take the class name, and method name to analyze, we will also set the level of logging in order to see more messages from the log mechanism of Kunai:
/// watch info and error messages from Kunai
spdlog::set_level(spdlog::level::err);

/// class name and method name
auto class_name = std::string(argv[2]);
auto method_name = std::string(argv[3]);
As we have previously seen, we need to analyze the DEX file, and for doing that, we again use the static function from Dex class, parse_dex_file.
// now the dex file...
auto dex_file = KUNAI::DEX::Dex::parse_dex_file(argv[1]);

if (!dex_file->get_parsing_correct())
{
    std::cerr << "Error analyzing " << argv[1] << ", maybe DEX file is not correct...\n";
    return 2;
}
And for using the disassembler, we have to retrieve the DexDisassembler object from the previous Dex object, for doing that we will call get_dex_disassembler that will return a pointer to the object, then if the user decided to use the recursive disassembly algorithm, we will choose it with the function set_disassembly_algorithm:
// obtain the disassembler from the DEX object
auto dex_disassembler = dex_file->get_dex_disassembler();

// if recursive disassembly is requested
// change the disassembly method
if (use_recursive)
    dex_disassembler->set_disassembly_algorithm(KUNAI::DEX::DexDisassembler::disassembly_algorithm::RECURSIVE_TRAVERSAL_ALGORITHM);
The previous code just retrieves the disassembler, but it doesn’t apply the disassembly process yet, we will need to call disassembly_dex for doing it. Before digging deeper into the disassembler, we recommend reading the function show_instruction, which is the one which manages the printing of the instruction in a cool way, showing first the opcodes from the instruction and then printing the instruction as a string:
void show_instruction(KUNAI::DEX::Instruction *instr)
{
    std::cout << std::right << std::setfill('0') << std::setw(8) << std::hex << instr->get_address() << "  ";

    const auto &opcodes = instr->get_opcodes();

    if (opcodes.size() > 8)
    {
        auto remaining = 8 - (opcodes.size() % 8);

        size_t aux = 0;

        for (const auto opcode : opcodes)
        {
            std::cout << std::right << std::setfill('0') << std::setw(2) << std::hex << (std::uint32_t)opcode << " ";
            aux++;
            if (aux % 8 == 0)
            {
                std::cout << "\n"
                          << "          ";
            }
        }

        for (std::uint8_t i = 0; i < remaining; i++)
            std::cout << "   ";
    }
    else
    {
        for (const auto opcode : opcodes)
            std::cout << std::right << std::setfill('0') << std::setw(2) << std::hex << (std::uint32_t)opcode << " ";

        for (std::uint8_t i = 0, remaining_size = 8 - opcodes.size(); i < remaining_size; ++i)
            std::cout << "   ";
    }

    std::cout << instr->print_instruction() << "\n";
}
Printing line by line
Now that we have left behind the cool printing we can continue, if we remember, at the beginning we checked if the user wanted to print basic blocks, or plot it as a dot file. In case none of those options is chosen, we just print the instructions from first to last, this is done with the next code:
/// we have to apply the disassembly ourselves since
/// the library only applies parsing
dex_disassembler->disassembly_dex();

if (!dex_disassembler->correct_disassembly())
{
    std::cerr << "Error in the disassembly of " << argv[1]
        << ", maybe some method was incorrect...\n";
    return 3;
}
Before we just retrieved the disassembler, but we didn’t apply the disassembly process. For doing this, we will call disassembly_dex, this will disassemble the whole DEX file. Then we can check if the disassembly process was correct calling correct_disassembly.
We are almost finishing this part, we just need to retrieve the instructions which are stored in a std::unordered_map, then we will go over that structure looking for the class and method user provided at the beginning of the code, and once it is found, we will show all the instructions one by one:
const auto &dex_instructions = dex_disassembler->get_dex_instructions();
/// dex instructions contain the next pair:
///     - encoded_method : instructions from method
/// we will check for each one if class name and method names
/// are correct
for (const auto &disassembly : dex_instructions)
{
    auto encoded_method = disassembly.first;
    const auto &instrs = disassembly.second;

    auto cls_ = reinterpret_cast<KUNAI::DEX::DVMClass *>(encoded_method->getMethodID()->get_class());

    if (cls_ == nullptr)
        continue;

    if (cls_->get_name() != class_name ||
        encoded_method->getMethodID()->get_name() != method_name)
        continue;

    std::cout << encoded_method->getMethodID()->pretty_method() << "\n";

    for (const auto &instr : instrs)
    {
        show_instruction(instr.get());
    }
}
The code is pretty straightforward, once we find the method, we just go over each instruction calling the function show_instruction.
Printing basic blocks or Plot
Now we will see the part of the code that prints the basic blocks, or dumps the plot into a .dot file. For obtaining the basic blocks, we will use the third part of Kunai, the Analysis class. For using the analysis, we will have to call the function get_analysis from the Dex object. This function has one parameter, this parameter is a boolean value that instructs Kunai whether to perform deeper analysis or not. If enabled, the analysis includes obtaining xrefs. In this case, xrefs are not needed, so we will specify false. Internally Kunai will provide the Analysis object with the disassembler, so the task is easier :D.
auto analysis = dex_file->get_analysis(false);
The next code will go over the methods looking for the method we want to dump, it is pretty similar to the previous code we wrote for the simpler printing:
const auto &methods = analysis->get_methods();

for (const auto &method : methods)
{
    if (method.second->external())
        continue;

    auto encoded_method = std::get<KUNAI::DEX::EncodedMethod *>(method.second->get_encoded_method());
    auto cls_ = reinterpret_cast<KUNAI::DEX::DVMClass *>(encoded_method->getMethodID()->get_class());

    if (cls_ == nullptr)
        continue;

    if (cls_->get_name() != class_name ||
        encoded_method->getMethodID()->get_name() != method_name)
        continue;

    ...
}
Once we have found the method, we have two different codes. One of the codes will print the basic blocks in the terminal, and will also show the edges between the different basic blocks, the other will just dump the code into a .dot file.
Dumping Basic Blocks
Since we already have a MethodAnalysis block, we will go over the different basic blocks. Basic Blocks in Kunai are stored together with two special blocks, one is a start block, and the other is an end block. This is made for fulfilling the requirements of what a CFG is (having an entry and end block). Also in Dalvik we find try and catch blocks, we will print them in a different way too:
const auto &blocks = method.second->get_basic_blocks();

std::cout << encoded_method->getMethodID()->pretty_method() << "\n";

for (const auto block : blocks.get_nodes())
{
    if (block->is_start_block())
        std::cout << "BB-Start Block\n";
    else if (block->is_end_block())
        std::cout << "BB-End Block\n";
    else if (block->is_try_block())
        std::cout << "BB-" << block->get_first_address() << " (try block)"
                    << "\n";
    else if (block->is_catch_block())
        std::cout << "BB-" << block->get_first_address() << " (catch block)"
                    << "\n";
    else
        std::cout << "BB-" << block->get_first_address() << "\n";

    for (auto &instr : block->get_instructions())
        show_instruction(instr);
}

std::cout << "Edges: ";
for (const auto & edge : blocks.get_edges())
{
    if (std::get<0>(edge)->is_start_block() || std::get<1>(edge)->is_end_block())
        continue;
    std::cout << "BB-" << std::get<0>(edge)->get_first_address()
        << " -> BB-" << std::get<1>(edge)->get_first_address() << "\n";
}
For printing the instructions we will use the code we previously saw.
Dumping a Dot file
Finally and to finish, we give the chance for dumping a .dot file. The MethodAnalysis object has a built-in function that allows doing this in a simple way.
std::string file_name = class_name + "." + method_name + ".dot";
method.second->dump_dot_file(file_name);
Trying the Disassembler
Now we will try the disassembler, and we will show the different options.
First of all we will show the disassembly of a simple function, the Java code used for the test is the next one:
import java.util.Scanner;

public class Main {
    public static void main(String[] strArr) throws Exception {
        Scanner scanner = new Scanner(System.in);
        int nextInt = scanner.nextInt();
        if (nextInt == 0) {
            System.out.println("You gave me value 0...");
        } else {
            System.out.println("Not a bad value :D...");
        }
        try {
            System.out.println(3 / nextInt);
        } catch (ArithmeticException e) {
            System.out.println("Divided by zero operation cannot possible");
        }
        scanner.close();
    }
}
Now we will apply the disassembly to that main function, in this case, this plain disassembly doesn’t tell us about the try or catch blocks.
$ $ ./dalvik-disassembler ../../kunai-lib/tests/test-try-catch/Main.dex "LMain;"  main
void Main->main(java.lang.String[])
00000000  22 03 0a 00             new-instance v3, java.util.Scanner (10)
00000004  62 00 00 00             sget-object v0, Ljava/lang/System;->in Ljava/io/InputStream; (0)
00000008  70 20 05 00 03 00       invoke-direct {v3, v0}, void java.util.Scanner-><init>(java.io.InputStream)
0000000e  6e 10 07 00 03 00       invoke-virtual {v3}, int java.util.Scanner->nextInt()
00000014  0a 00                   move-result v0
00000016  00 00                   nop
00000018  00 00                   nop
0000001a  39 00 0a 00             if-nez v0, 10
0000001e  62 01 01 00             sget-object v1, Ljava/lang/System;->out Ljava/io/PrintStream; (1)
00000022  1a 02 12 00             const-string v2, "You gave me value 0..." (18)
00000026  6e 20 03 00 21 00       invoke-virtual {v1, v2}, void java.io.PrintStream->println(java.lang.String)
0000002c  28 08                   goto 60
0000002e  62 01 01 00             sget-object v1, Ljava/lang/System;->out Ljava/io/PrintStream; (1)
00000032  1a 02 0e 00             const-string v2, "Not a bad value :D..." (14)
00000036  6e 20 03 00 21 00       invoke-virtual {v1, v2}, void java.io.PrintStream->println(java.lang.String)
0000003c  12 31                   const/4 v1, 3
0000003e  b3 01                   div-int/2addr v1, v0
00000040  62 00 01 00             sget-object v0, Ljava/lang/System;->out Ljava/io/PrintStream; (1)
00000044  6e 20 02 00 10 00       invoke-virtual {v0, v1}, void java.io.PrintStream->println(int)
0000004a  28 09                   goto 92
0000004c  0d 00                   move-exception v0
0000004e  62 00 01 00             sget-object v0, Ljava/lang/System;->out Ljava/io/PrintStream; (1)
00000052  1a 01 01 00             const-string v1, "Divided by zero operation cannot possible" (1)
00000056  6e 20 03 00 10 00       invoke-virtual {v0, v1}, void java.io.PrintStream->println(java.lang.String)
0000005c  6e 10 06 00 03 00       invoke-virtual {v3}, void java.util.Scanner->close()
00000062  0e 00                   return-void
Now we can specify the disassembler to show the basic blocks and the connection between the basic blocks.
$ ./dalvik-disassembler ../../kunai-lib/tests/test-try-catch/Main.dex "LMain;"  main -b
[2023-06-10 21:46:00.208] [stderr] [info] Analysis: correctly added parser to analysis object
void Main->main(java.lang.String[])
BB-Start Block
BB-0
00000000  22 03 0a 00             new-instance v3, java.util.Scanner (10)
00000004  62 00 00 00             sget-object v0, Ljava/lang/System;->in Ljava/io/InputStream; (0)
00000008  70 20 05 00 03 00       invoke-direct {v3, v0}, void java.util.Scanner-><init>(java.io.InputStream)
0000000e  6e 10 07 00 03 00       invoke-virtual {v3}, int java.util.Scanner->nextInt()
00000014  0a 00                   move-result v0
00000016  00 00                   nop
00000018  00 00                   nop
0000001a  39 00 0a 00             if-nez v0, 10
BB-1e
0000001e  62 01 01 00             sget-object v1, Ljava/lang/System;->out Ljava/io/PrintStream; (1)
00000022  1a 02 12 00             const-string v2, "You gave me value 0..." (18)
00000026  6e 20 03 00 21 00       invoke-virtual {v1, v2}, void java.io.PrintStream->println(java.lang.String)
0000002c  28 08                   goto 60
BB-2e
0000002e  62 01 01 00             sget-object v1, Ljava/lang/System;->out Ljava/io/PrintStream; (1)
00000032  1a 02 0e 00             const-string v2, "Not a bad value :D..." (14)
00000036  6e 20 03 00 21 00       invoke-virtual {v1, v2}, void java.io.PrintStream->println(java.lang.String)
BB-3c (try block)
0000003c  12 31                   const/4 v1, 3
0000003e  b3 01                   div-int/2addr v1, v0
00000040  62 00 01 00             sget-object v0, Ljava/lang/System;->out Ljava/io/PrintStream; (1)
00000044  6e 20 02 00 10 00       invoke-virtual {v0, v1}, void java.io.PrintStream->println(int)
0000004a  28 09                   goto 92
BB-4c (catch block)
0000004c  0d 00                   move-exception v0
0000004e  62 00 01 00             sget-object v0, Ljava/lang/System;->out Ljava/io/PrintStream; (1)
00000052  1a 01 01 00             const-string v1, "Divided by zero operation cannot possible" (1)
00000056  6e 20 03 00 10 00       invoke-virtual {v0, v1}, void java.io.PrintStream->println(java.lang.String)
BB-5c
0000005c  6e 10 06 00 03 00       invoke-virtual {v3}, void java.util.Scanner->close()
00000062  0e 00                   return-void
BB-End Block
Edges: BB-2e -> BB-3c
BB-4c -> BB-5c
BB-3c -> BB-5c
BB-1e -> BB-3c
BB-0 -> BB-1e
BB-0 -> BB-2
As we can see in the previous output, this time the disassembler tells us about the basic blocks that belongs to this method. We have two empty nodes (start and end), and we also have two special basic blocks, one is the try block and the other the catch block.
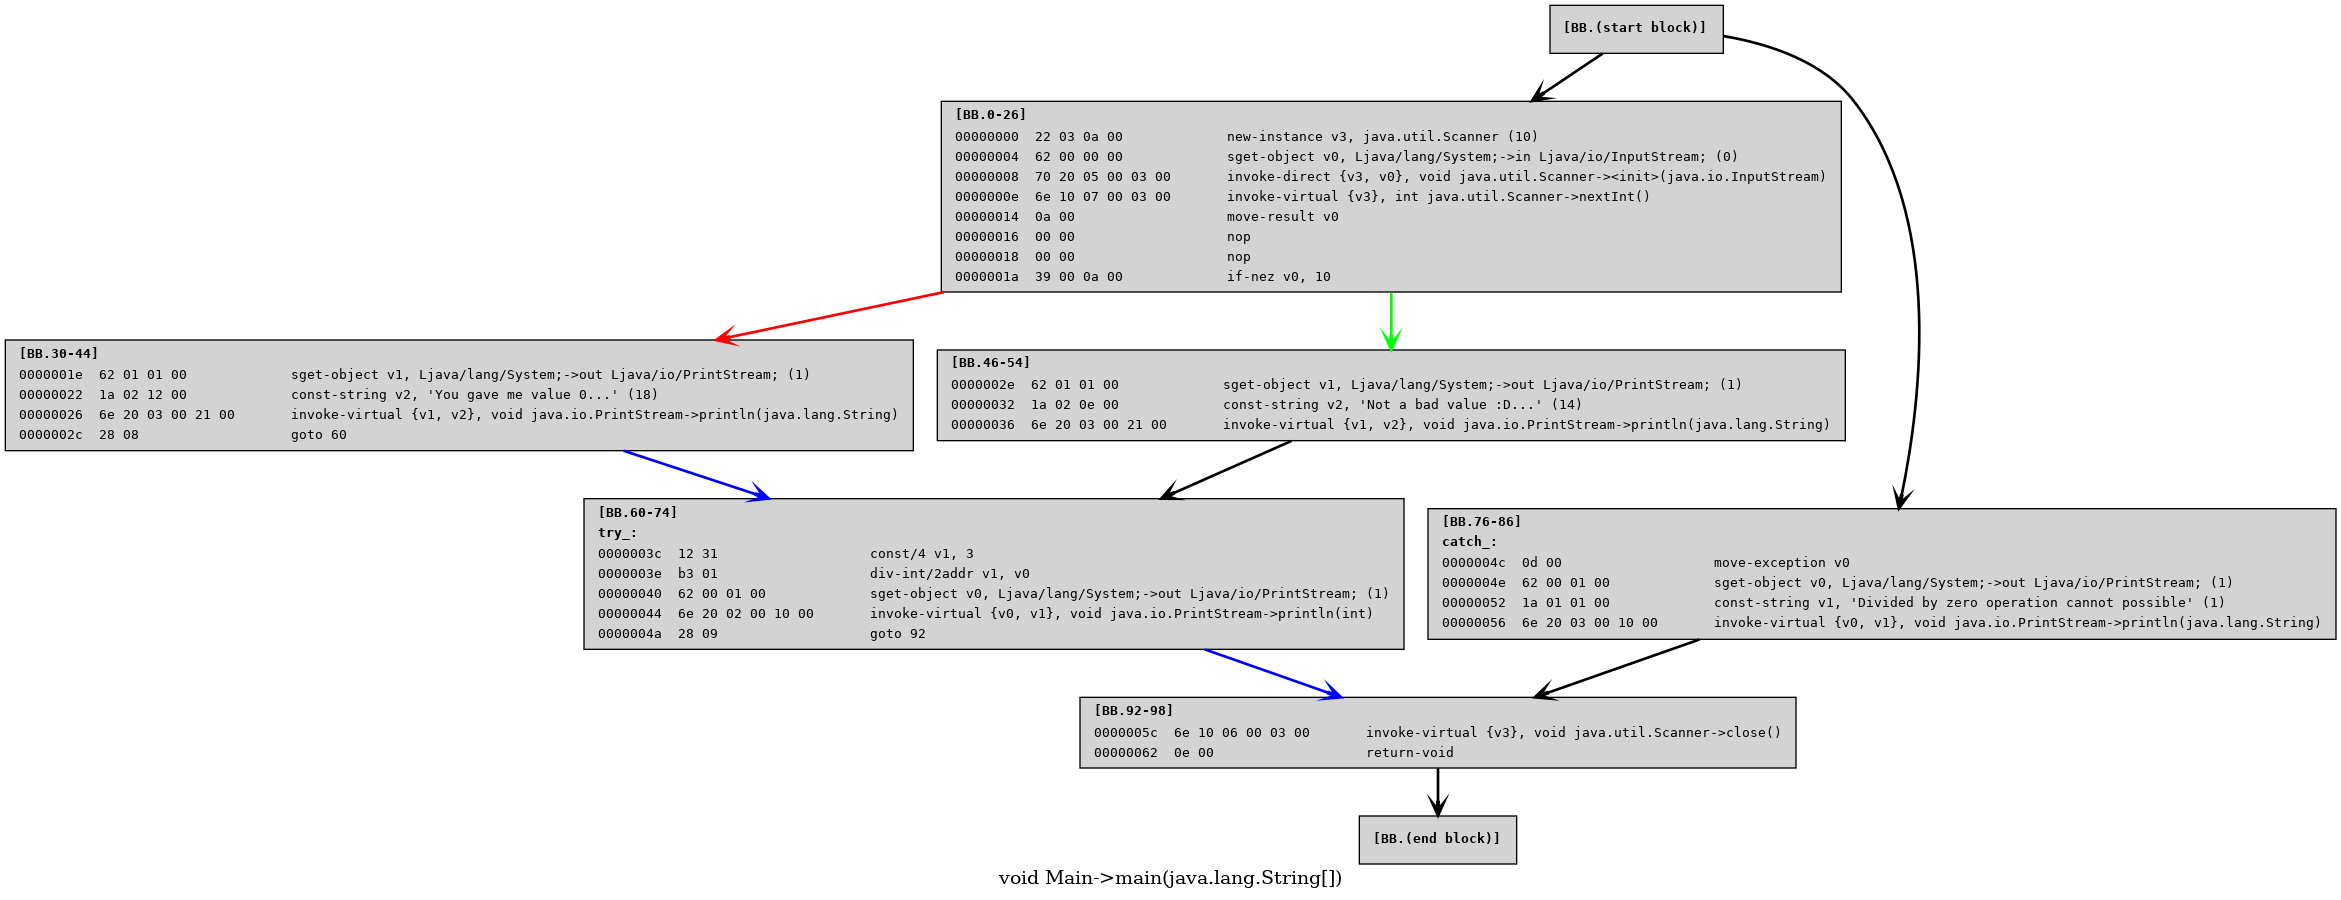
Finally we will generate a .dot file, and we will convert it to a .png.
$ ./dalvik-disassembler ../../kunai-lib/tests/test-try-catch/Main.dex "LMain;"  main -p
[2023-06-10 21:47:33.994] [stderr] [info] Analysis: correctly added parser to analysis object
$ dot -Tpng LMain\;.main.dot -o main.png
The output is shown in the next image, this output shows the basic blocks as before, with their tags indicating if they are start, end, try or catch blocks. But also for the conditional jumps, the connections between the blocks will be painted on green (jump is taken) and red (jump is not taken, fallthrough), and unconditional jumps will be colored on blue.
You can find all the code for this project in here
Last words
This long post tries to explain some basic usage from Kunai, Kunai is an ongoing project, so any help is always appreciated and welcome!
We hope you enjoyed the post, and also try using Kunai in one of your projects, you can contact us through the email of the project kunai.static.analysis(at)gmail(dot)com, if you use it in any of your projects, we will be happy to reference it in the repository.
See you in the next post!